Saturday, September 30, 2006

Weekend Cookbook Challenge #9

The theme for this month's Weekend Cookbook Challenge, hosted by Sara of I like to Cook was an ingredient from my country.

After tossing various ideas back and forth I settled for an indigenous ingredient in the form of Wattle seed.

wattle seeds

These are roasted and ground Wattle seeds available from a company called Oz Tukka. The seeds are harvested in the wild by aboriginal communities - it's important to note even though there are over seven hundred varieties of wattle only a few are edible.

There is a resemblance to ground coffee and they do impart a somewhat subtle coffee flavour with elements of hazelnut and chocolate thrown in for good measure.

Since I was using an Australian ingredient I decided to double up and use an Australian cookbook by one of most well known doyens of the kitchen, Donna Hay.

With the flavouring of the seeds I added them to a rather simple white chocolate cake from Modern Classics Book 2 to turn it into something a little different.

cake

Wattle seed & White Chocolate Cakes
[Makes 12 individual cakes or 1 x 22cm/9 inch cake]

185 grams butter, diced
1 cup milk
1½ cups caster sugar
150 grams white chocolate, chopped
2 cups plain flour
1½ teaspoons baking powder
1½ teaspoons wattle seeds
2 eggs

Preheat the oven to 160°C/325°F.

Place the diced butter, milk, sugar and white chocolate into a small saucepan and over a low heat. Stir until melted and smooth.

Sift the flour and baking powder into a bowl. Stir through the wattle seeds. Lightly whisk the eggs before stirring them into the flour. Whisk in the chocolate mixture to form a smooth batter.

Pour into pan and bake for around 50 minutes - if making individual cakes, check after 20 minutes.

Cool on wire racks - serve this warm or cold, perfect with a dollop of cream.

Tagged with :

Friday, September 29, 2006

Sesame-topped Currant Muffins

Who says simple muffins have to be boring? These relatively healthy muffins are given an appetising look in the form of a crunchy sesame studded crust. If sesame seeds fail to appeal, replace them with a rough crush of your favourite type of nut.


muffins


Sesame-topped Currant Muffins
[Makes 6 large Muffins]

320 grams plain flour
55 grams caster sugar
1 tablespoon baking powder
½ teaspoon ground ginger
½ teaspoon ground cinnamon
100 grams currants (you can replace this with any dried fruit)
1 egg
250ml/1 cup milk
80 grams melted butter
Sesame-topping:
2 tablespoons sesame seeds
2 tablespoons soft brown sugar

Make the topping:
Add the sesame seeds and brown sugar to a small bowl and stir until well combined.

Make the muffins:
Sift the flour, baking powder, sugar, cinnamon and ginger into a bowl. Stir through the currants.

In a small bowl add whisk the egg with the milk before adding the melted butter.

Stir this through the dry ingredients until just combined. It's most important not to overwork the mixture.

Fill the muffin cases three-quarters full then generously sprinkle over with the sesame-topping.

Bake in a preheated 180°C/350°F oven for 20-25 minutes or until cooked through and topping is golden.

muffin

Cool on a wire rack.

muffin

You won't have to sneak these into lunch-boxes!

Tagged with

Thursday, September 28, 2006

Cheese: Elgaar Farm

Elgaar Farm is located in Deloraine, 50kms west of Launceston in Tasmania. Founded by Bavarian dairy farmers Joe and Antonia Gretschmann in 1986 they set about converting the farm and by 1991 it was certified organic.

Elgaar Farm is the type of place that were you reincarnated as a Jersey Cow this would be as close to paradise as you could get. Here, every cow is named, they are free to roam the organic pastures, nibbling on herbs and clover and when the time comes and they are too old to be milked, they see their life out on the farm in happy retirement. It's said one of their oldest cows lived to 38!

The cheese I'm looked at today is a Vintage Cheddar - but don't be lulled by this rather nondescript black cylinder - this is one vintage cheddar that bites back!

cheddar

Cheese Maker: Elgaar Farm
Cheese Name: Club Cheese
Location: Deloraine, Tasmania

cheese

Peel off the black wax and this golden core of cheese appears, made from selected wheels of Aged Vintage Cheddar - you could be excused for thinking that it's butter.

cheese

Texture wise it's soft with a slight crumbly texture and it just entices you to cut off a large chunk. But beware, beyond the creamy mouth feel, there's a massive kick, a spice unlike most cheddars out there. I must admit it even caught Paalo by surprise - my warning came a little too late as he succumbed to temptation and popped a generous shard into his mouth. His initial reaction to the pleasant creaminess soon gave way as the cheese bite back.

I would recommend serving this with something more robust than a cracker - a hearty grain bread is a better match. Pickled onions and gherkins, cured meats and this cheddar will round out a rather pleasant ploughman's platter.

Tagged with

Wednesday, September 27, 2006

Blood Orange Cordial

Cordials may be a bit old fashioned but they are so simple to make in whatever flavour you desire. Having quenched a thirst for ginger and lemongrass I turned my attention towards to that fruit in season, blood oranges.

Apparently the fruit sizes are small this year making them less desirable to the supermarkets. With a very hot January, the trees went into a survival mode and the fruit stopped growing, but I can vouch on the quality of their flavour. Size certainly isn't everything!

Blood Oranges© by haalo


These are all blood oranges but as you can see the internal colouring does vary - in the four that I used, two had that intense blood orange colouring and two had mild veining. This didn't stop me from getting a vibrant coloured juice.

Blood Orange Juice© by haalo


To make the cordial, sugar and water is adding to the juice and the mixture is reduced in a simmer to concentrate the flavour and create this glistening jewelled drop...

Blood Orange Cordial© by Haalo


Blood Orange Cordial

250ml/1 cup blood orange juice (I used 4 oranges)
1 cup water
1 cup caster sugar


Place the water, blood orange juice and sugar into a saucepan over medium heat and stir until the sugar dissolves. Simmer for 10 minutes until it is reduced by about a third. This should take about 10 minutes.

Cool in the pan before straining into a bottle. Store in the fridge.

I like to use fizzy mineral water in the ratio of roughly 1 part cordial to 2 parts water, though this really is up to your own personal taste. Adding the syrup to gin or vodka wouldn't go astray either.

Blood Orange Cordial© by Haalo

Tuesday, September 26, 2006

Burghul Bread

Zorra from Kochtopf is hosting a wonderful event that immediately got my attention. To help celebrate World Bread Day on the 16th of October she's asking us to either bake or buy bread and write a post about it. She even designed this great logo too!

Bread really is a universal constant in the world of food but for something so simple it's made in so many different ways. If you're a bread lover then mark this date in your calendar.

I'm hoping that between now and the 16th I'll have a few different breads made and I'm starting with a more usual bread.

This recipe comes from Let it Simmer by Sean Moran. The unusual ingredient in this bread is burghul. What's burghul you may be asking. It's this stuff on the spoon.

burghul

Cracked wheat is another name, though not entirely accurate - it can also be called bulgur, bulgar, bulger, bulghur or burghal. You'd probably be more accustomed to seeing it as part of Tabouli (or Tabbouleh).

Burghul is made from whole wheat kernels that are partially hulled. They are then soaked, steamed, dried and finally crushed. This crushed product is burghul. True cracked wheat has no soaking or steaming process - it's simply crushed wheat berries. It will take longer to cook than burghul, so if you use it, you need to factor in a longer cooking time.

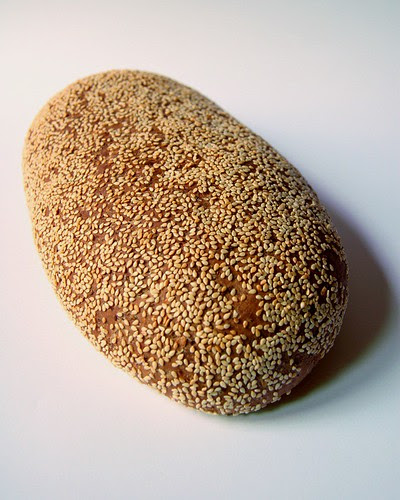
Returning to the bread, this is probably one of the more "healthier" breads - it contains Spelt Flour (some information about Spelt can be found here), Wholemeal Flour, Oats and Burghul to create something that not only is good for you, but looks pretty good too.
bread

Burghul Bread
(This makes 2 loafs - just halve the quantities to make one)

100 grams Burghul (or cracked wheat)
250ml water
½ teaspoon salt
2 teaspoons soft brown sugar
2 teaspoons dried yeast
50ml tepid water
½ cup sesame seeds
Dough:
750 grams Spelt flour (or unbleached baker's flour)
190 grams wholemeal plain flour
½ cup rolled oats (or unprocessed bran)
1½ tablespoons salt
50ml olive oil
400ml tepid water

Prepare the Burghul:
Bring the 250ml of water to boil in a saucepan and stir in the burghul and ½ teaspoon salt. Stir occasionally and allow it to simmer until the water is absorbed and the burghul has softened. This will take about 10-15 minutes. When cooked place it in a bowl and allow it to cool to room temperature.

Activate the yeast:
In a small bowl add the yeast, brown sugar and 50ml tepid water - whisk to combine and place in a warm spot for about 10 minutes or until it's foaming.

Make the dough:
Sift the flours into a large bowl then stir in the oats, followed by the softened burghul. Make a well in the centre of the mixture and add the activated yeast, olive oil, salt and water. Since all flours are different you may need to add more (or less) water than listed. Begin by adding 300mls and continue adding until the dough reaches the correct consistency.

For this dough I needed to add another 50mls.

If you don't want to do this by hand then use a stand mixer - I must say that this quantity proved to be a little too much for the Kitchenaid, so keep that in mind. If you make half the amount that should be fine.

Knead the dough until it's smooth and elastic - about 10-15 minutes. Form into a ball and place it in an oiled bowl covered with plastic wrap.

before

Leave in a warm spot to prove until doubled in size - about 1½ hours.

after

When risen, tip it out onto a board, cut in half and knead each half for about 5 minutes. Form into a long log shape.

Place the sesame seeds in a large dish and roll the dough into this - ensuring it's totally coated in seeds. Press the seeds against the dough to make sure they are stuck. Place this on baking paper and allow to rise again until doubled in size - about 1 hour.

risen

close up

Preheat your oven to 250°C/480°F
Finely mist warm water over the loaves before placing them in the oven and turn down the temperature to 200°C/390°F. Bake for 40-50 minutes or until the bread is golden brown and sounds hollow when tapped. If you feel they are browning too quickly, turn the oven down to 180°C/350°F.

Cool on wire racks.

cooked

This slices so very easily, the crust is crispy and thick, the core is wonderfully dense yet soft due to the effects of the burghul.

sliced bread

It's delicious eaten warm, thickly spread with honey.

Tagged with

Sunday, September 24, 2006

Rhubarb Tart with Semolina Cream

For Weekend Herb Blogging, hosted by Kalyn, I've decided to indulge myself with some Rhubarb.

Rhubarb

Rhubarb is a member of the Rheum family, a native perennial plant of Asia. Rich in Vitamin C, fibre and calcium it was originally cultivated in China over 2000 years ago for its medicinal usage (it was used as a laxative and digestive). It was introduced to Europe by Marco Polo and its use as a food dates only to the 17th Century, a side-effect of the increased availablity of sugar.

The one negative aspect of Rhubarb comes in the form of it's leaves - they are considered poisonous due to the presence of oxalic acid.

These rather photogenic stalks of rhubarb are another of my farmers' market finds - they are Di's Rhubarb grown up north in the state at Tabilk. I was particularly draw by their delicate stalks and I knew that they would be perfect for a tart that I've been wanting to make for a while now. The hurdle had always been finding rhubarb that was thin enough and these were just the right size.

The tart in question is from Australian Gourmet Traveller and when you see it, you might understand why I just had to make it.

tart

Rhubarb Tart with Semolina Cream

Pastry:
250 grams plain flour
50 grams icing sugar
125 grams butter, cubed
1 egg, lightly beaten

Semolina Cream:
1 1/2 cups milk
1 cinnamon stick
55 grams caster sugar
45 grams semolina
3 egg yolks

Topping:
Rhubarb stems
55 grams caster sugar

Make the pastry:
Place the flour, icing sugar and butter into a food processor and pulse until the mixture resembles bread-crumbs. Add the beaten egg and pulse until the mixture comes together.
Turn out onto a board and just knead it to make a ball before patting it out into a rectangle shape. Wrap in plastic and place in the fridge for at least an hour or until it's firm enough to roll.

Roll the dough out on baking paper (this just makes it easier to move) until it's large enough to line a 13cm x 35cm tart tin. Cover this with baking paper and weights and chill for an hour.

Preheat the oven to 180°C/350°F - bake for 15 minutes, then remove paper & weights and cook for another 15 minutes or until the pastry case is dry and golden. Let this cool before using.

Make the Semolina Cream:
Place the milk, cinnamon stick, sugar and semolina into a saucepan over a low heat and stir while the mixture starts to thicken and boil, then stir constantly for another 2 minutes or until the mixture becomes very thick.

Remove from the heat and whisk in the egg-yolks, one at a time until well combined. Place the filling into a bowl and cover with plastic wrap - make sure the plastic wrap actually rests against the cream as you don't want a skin to form. Let this cool to room temperature.

Assemble the tart:
Pour the semolina cream evenly into the tart, smoothing out the top. Lay the rhubarb evenly over the cream then sprinkle over with half of the sugar.

tart

Cover this loosely with foil and place in a preheated 180°C oven - cook for 20 minutes before removing foil. Continue to cook for another 15-20 minutes or until the cream is set and the rhubarb is tender.

Sprinkle over with the remaining sugar and using a blow-torch, caramelise the sugar (you could do this under a grill).

rhubarb tart

Serve this warm or at room temperature.

serving

Tastewise - it's a winner from the pastry up. The pastry is wonderfully buttery, crisp and crunchy, like shortbread. The semolina cream is extremely smooth with a good density - easily able to carry the softened rhubarb.

This was one tart that was worth the wait - though I hope it won't be too long before I make it again.

Don't forget that next week marks one year of Weekend Herb Blogging and in celebration, Kalyn is calling on all bloggers to nominate their favourite herb - so put your thinking hats on and get those nominations in by next weekend - to misquote Iron Chef "Which Herb will reign supreme?"

Friday, September 22, 2006

Moghrabieh Custard with Kaffir Lime Leaf Syrup

Alanna from A Veggie Venture is hosting this month's Sugar High Friday and she settled on a most surprising theme. Well, the theme is a surprise inside - and it had me seeking diving intervention in the form of Charlie Trotter's Desserts. It's in the pages of this book that I found the light - a dessert using two surprising ingredients, Kaffir Lime Leaf and Moghrabieh.

kaffir lime leaf and moghrabieh© by haalo


I've talked about Kaffir Lime Leaf before - it's a leaf from the Kaffir Lime Tree, used in Thai cooking, it imparts citrus notes. Moghrabieh (or Mograbieh) is offer labelled large couscous but this isn't quite correct - made with semolina and flour, it's closer to being a pasta. The original recipe calls for Israeli Couscous - from research it seems these two are pretty much interchangeable.

When given these two ingredients, 99.99% of the time if you guessed they went into a savoury dish you'd be right but Charlie Trotter performs a bit of magic - the moghrabieh is cooked in a mix of orange juice and water until softened and then combined in rich custard. With the use of gelatine, the grains become suspended in this pillow of cream. Before serving it's ringed with strawberry slices and a drizzle of a most amazing kaffir lime syrup to produce his crowning glory

moghrabieh Custard with Kaffir Lime Leaf Syrup© by Haalo

Thursday, September 21, 2006

Cheese: Udder Delights

They may have a quirky name but Udder Delights produce seriously good cheese.

Founded in 1999 and based in the Adelaide Hills in South Australia they are most well known for their goat cheese though they have recently expanded their range to include Jersey cow milk cheese.

udder delights

Cheese Maker - Udder Delights
Cheese Name - Goats Camembert
Location - 15/1 Adelaide Lobethal Rd, Lobethal, South Australia
I should note that a Cheese Cellar will be opening in Spring 2006, located at Hahndorf. It will be a centre for sales, tastings, education and include a café.

In this silver parcel lays a cheese that wanders the line between solid and liquid. This is made in the Normandy style using non-animal rennet.

Before serving this cheese it's most important to get an indication of it's level of maturation - this is done by gently squeezing the sides of the cheese. At full maturation the cheese is liquid and would be served by just cutting off the top of the cheese and serving it as is, with the rind as a bowl.

camembert

This cheese has about 2 weeks to go before reaching that total molten state so it's safe to cut - there's some softness when squeezed so I will get some of that desirable oozing

cut

This illustrates the two states - the cheese is maturing from the rind to the core - in two weeks time that solid section will have converted.

serve

I don't know about other people, but I find this type of cheese very hard to resist. It's best to serve this at room temperature, to maximise the ooze and release the flavours, just take it out of the fridge about an hour before you want to eat (or drink) it.

udder delight

Tastewise, it has a creamy mouth-feel - the rind is quite mild at this state and this cheese should appeal to all cheese lovers.

It's an utterly delightful cheese!

Tagged with

Tuesday, September 19, 2006

Slashfood Sandwich Day

Mark the date on your calendars - September 21st is Slashfood Sandwich Day and we're all encouraged to make sandwiches to celebrate.

sandwich

At the heart of a every good sandwich is the bread and I've chosen a wonderfully crafted seven seed sourdough. You just know that whatever you put inside, it's going to taste great.

bread

For the filling, I've opted for a bit of luxury in the form of Tasmanian Smoked Salmon. Instead of the regulation cream cheese, I've used some of the Labne I made and spread this over one side of the bread, then covered it with a layer of baby Asian salad greens and finely sliced salad onion. Underneath the salmon are slices of avocado.

fillings

Fold these two halves together and voilà!

sandwich

Smoked Salmon Sandwich

1 Sourdough roll
2 Labne balls
5 slices of smoked salmon
Mixed baby salad leaves
1 small salad onion, sliced finely
1 small avocado, sliced


sandwich


Tagged with

Monday, September 18, 2006

Mixology Monday VII

Paul from Cocktail Chronicles is hosting this edition of Mixology Monday with the theme of Goodbye Summer. Here in Australia, it's more of a case of Hello Summer, Goodbye Winter.


With summer comes a multitude of berries and this cocktail is all about the combination of berries and watermelon - to form a cocktail whose vibrant colour is almost as appealing as its refreshing qualities.

cocktail

Waterberry Vodka Cooler

½ cup berries of your choice
1 cup watermelon
30ml Lemon Vodka
15ml sugar syrup
½ cup ice

Add the berries, watermelon, vodka and ice to a blender and process. Taste and depending on the fruit you may need to add the sugar syrup. Pour into tumblers and serve.

cocktail

Tagged with

Sunday, September 17, 2006

Making Labne

Labne is one of the easiest types of cheese you can make. It's a yoghurt cheese with a middle eastern heritage and it's simply made by draining yoghurt through muslin. It really is that simple.

bottled

Labne

500 grams plain Greek-styled yoghurt (I've used buffalo yoghurt)
1/2 teaspoon salt
finely chopped fresh herbs
olive oil

Place the yoghurt in a bowl and stir in the salt.

Line a small bowl with several layers of muslin and pour the yoghurt into this. Draw the muslin in, using the shape of the bowl to help form a ball. Twist the gathered muslin, you'll immediately notice liquid dripping out, continue twisting until you've formed a tight ball, then tie this off with kitchen twine. Suspend this over a deep bowl and place in the fridge - I tie the twine around a wooden spoon and dangle it over the bowl, there needs to be a gap between the base of the ball and the bowl.

Depending on the type of yoghurt you've used, you'll need to let this drain at least overnight and possibly two days. Don't forget to discard the liquid at regular intervals. When it feels firm then it's time to go onto the next step.

drained

One thing you will notice is that it's probably half the size it was when you started.

inside

You can use it as is - just turn it out onto a platter and sprinkle over with the herbs and a good drizzle of olive oil. Or you could have added the herbs initially along with the salt.

herbs

The herbs I've used are coriander, parsley, mint and chives - you can vary this mix but try to stick with the softer types of herbs. You could also try adding spices like sumac or paprika.

Pinch off tablespoonfuls and roll into balls and drop them into the finely chopped herbs. It's probably best to wear kitchen gloves when doing this.

coating

coated

Once you've formed and coated all the labne balls store them in the fridge for a few hours before storing them under olive oil - this just helps to set the labne's shape.

preserved

Serve them as part of an antipasto or meze, add them to salads - or just eat them spread over Turkish bread.

Tagged with

Saturday, September 16, 2006

Weekend Herb Blogging #50

Weekend Herb Blogging takes a trip to Milano, Italy where it's hosted by Piperita of The Kitchen Pantry. Oddly enough I'll be using two ingredients that aren't associated with the typical Italian kitchen - namely, Ginger and Lemongrass.

ginger & lemongrass

Ginger is believed to have its origins in either China or India and it has a long history, dating back to the writings of Confucius.

It is classed as a rhizome - when fresh it has a truly unique aroma which is both sweet yet earthy. Just harvested young ginger has a green and pink tone to it's soft skin, as it ages this skin becomes thicker and darker - it's texture changing from soft to fibrous. When choosing you should look for those that are plumb and firm and bypass those that feel dry and look wrinkled.

It's probably one of the more versatile spices, able to be found in various forms, be it candied, crystallised, dried, pickled, powdered or preserved in syrup - it's uses covering the whole gamut, be they sweet, savoury or liquid.

Medicinally it is used to treat nausea and motion sickness - something that Mythbusters even proved was true. Ginger drinks improve digestion and blood circulation, especially useful in treating gout. It's also an anti-oxidant rich food.

Though it's not all rosy for ginger - this is no longer a problem for Paalo but those with gallstones should avoid ginger as it encourages the production of bile.

Lemongrass is a staple herb of many Asian cuisines and it's popularity has soared here in Australia. It contains the essential oil Citral which gives it it's lemon scent. It's a tropical grass that is indigenous to Southern India and Sri Lanka.

Predominately the base of the plant is used for curry pastes or soups- look for those that are bulbous with a delicate pink hue to the outer layers and a crisp white stem. The upper section is used to make tea

Lemongrass is known for it's antiseptic properties - often found in food rubs, it's a natural deodoriser. Lemongrass oil is used to treat certain skin complaints and muscle pain - as a stress reliever, a few drops of this natural oil in a burner produces a calming atmosphere.

Like ginger there are some provisos - don't use it on children, glaucoma suffers and those with damaged skin or skin hypersensitivity.

In Chinese medicine, lemongrass is used to treat colds and coughs. It's considered to be a diuretic, stimulant and tonic as it encourages digestion.

I've decided to put these two ingredients together to create a tangy tonic that should do wonders for the digestive system - an extremely simple cordial that is perfect for those warmer days, and if you feel that way inclined, it's excellent teamed with a little vodka.

refreshing

Ginger and Lemongrass Cordial

175 grams ginger, peeled and sliced finely
1 stalk lemongrass
1½ cups sugar
2 cups water
1 lemon, juiced

This recipe is made to be mixed with water - I like to use sparkling mineral water to give it that fizzy lift without having to go the ginger beer route and deal with the sometimes explosive use of yeast.

If the ginger is very young, you won't need to peel it - just slice it as finely as you can.

With the lemongrass, chop off the woody tip - as it is hard, just chop it roughly into chunks. With the base, roughly smash it with a kitchen mallet or the handle of your knife - this loosens the fibres. Slice this into fine rings.

Place a saucepan over a medium heat and add the sugar, water and lemon juice. Stir until the sugar just dissolves then add the sliced ginger and lemongrass. Let this slowly simmer for 15 - 20 minutes - you want the syrup to reduce and thicken and the lemongrass and ginger to release their flavours.

When the time has elapsed, turn off the heat and let it sit until cold.

Strain this into a bottle - discarding the ginger and lemongrass. You'll notice that your cordial has really taken on the colour of the ginger, giving it a pink-orange tone.

Depending on how strongly flavoured you like your drink, this works in roughly 1 part cordial to 2 parts water.

mixing

Tagged with :
© Cook (almost) Anything at Least Once | All rights reserved.
BLOG TEMPLATE HANDCRAFTED BY pipdig